Friday, May 11, 2012

All Decked Out

I can't be sure about this, but I think that most people, when they want to do a project around the house, tallly what it will cost then go buy materials and begin the project. 
That's not the way it works in our household; we usually wait till the materials . . . . . materialize, then we make plans to use the materials for this or that. 
When someone gave Bill some wonderful hefty 2x10's last summer, we decided to use those boards to build a deck. Stakes for the new deck were soon in place, and the project was underway. 


The plan was to eventually put a door of some sort that would lead from the new deck into the dining room. So while the deck went up I put the word out that we were looking for a sliding glass door. The planning stage is always my favorite part of any project, so I had fun checking the prices of new doors and thinking about how I could avoid having to buy a new door. 

The deck was soon in place, and I did find a door - but that's another story for another day. 

And of course we'd need to add a tree to the landscape, too, eventually, for shade. I love the way one project feeds into another one. 

I love the whole process.

Oh, oh! I also began to formulate plans for incorporating the new deck into its environs......

Plants! We'd need more plants! A happy problem! Something to look forward to as the colder weather started to set in.

The new deck was in by the end of summer, 2011. 

Now it was time to start planning for that new door!
To be continued....
We eventually installed a sliding glass door - cut through the stone to add a door where the big window is in the photos above. To see more about the new door, please click this link:

Thursday, May 10, 2012

A Tribute To My Dear Husband Bill

We almost lost Bill - my dear husband - during the winter of 2010/2011. He was at death's door more than once during those awful months. After God restored him to health, we got busy. From mid-2011 through the end of that year, we completed many projects, some of them huge: We planted a hedge row beside the driveway; Bill added two new large planters near the patio; a deck went up; a sliding glass door went in; and we built a stand-alone workshop at the east end of the driveway. 

Bill has gone along - sometimes reluctantly, albeit! - with every one of my hare-brained ideas! Oh, sure, he puts up a fuss at each new suggestion, but in the end, he's on board and working hard to make my ideas a reality. 

From shoveling manure onto plants in the yard . . .

To helping his sons with their projects . . . .

To loving on his grandchildren . . . . 

To putting up with yours-truly . . . .

And spending time with his family . . . .

Well, you get the  idea!! Bill's a gem. He's a keeper.
God is good . . . . .


Tuesday, May 8, 2012

Pass-Through

One day, oh, about 6 years ago, I was walking around in our kitchen trying to figure out something new I could do to that room. I first thought about moving the fridge against a different wall, but that wouldn't work, I decided, because there that would have put the fridge up against a baseboard heater. Then I thought about tearing down the wall between the kitchen and the living room, but I quickly discounted that idea because it would entail messing with electrical wires and such - plus that wall could be a load-bearing wall, I further opined. Then it hit me: We could put a pass-through on that one wall, the wall  between the kitchen and the living room. 

It's a good thing this pass-through idea was a good one because shortly after I suggested the idea to Bill I heard his reciprocating saw buzzing and went in to investigate and found a gaping hole in the wall!

He soon had that hole trimmed with beautiful barn wood, though, and I heaved a sigh of relief: That heretofore dark corner of the kitchen was transformed by the pass-through of light from the living room. 
Oh, and a bonus: People in the kitchen could now see into the living room. Cool! 
My Dad - one of our biggest cheerleaders in re to any remodeling we did - came to see us one day shortly after the pass-through went in, and he suggested we take pictures and use the pass-through as a sort of frame. So that's what we did. 


But this project was not over yet: I had the idea to add some gingerbread at the top of the new opening. After I came up with a pattern, Bill insisted that there was NO WAY he could cut such an intricate pattern in hard wood.
The next day when I got home from work, Bill presented me with a gift: He'd rough-cut the design in wood, and it was lovely.

Now it was my turn to do some work: I got busy with my rotary tool, shaping and smoothing tho rough-cut edges of the trim. 
Why, there's Dear Bill, coating the pass-through with polyurethane.....

Eventually this wall would be covered with barn wood - our intention for that wall all along - but that's another story for another day. 

Bye for now.
Susan


Monday, May 7, 2012

Sleep Tight: The Bedrooms

While our style is a bit subdued in the rest of the house, we cut loose color-wise in the bedrooms. My husband picked the color for our bedroom walls . . . .

. . . .  and Will picked the color for his bedroom. And people think that I use color liberally! Ha! 
A funny story: When Bill suggested, one hot summer morning, that we should paint Will's bedroom, I went along with the idea; I was eager to check that task off our to-do list. The problem was, it was very hot that day. So While Bill went in to start painting, I had a brilliant idea: I would paint naked! It was that hot! So I took off all my clothes and sauntered into Will's room, where Bill was busily rolling paint onto the walls. And, guess what? Bill was naked! He had the same idea I had. Well, you know, people do say that Bill and I work well together!! They don't know the  half of it.....


Sunday, May 6, 2012

Pallet Wood Redo In the Bathroom

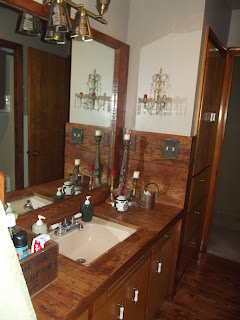
When it came time to redo our bathroom floor and counter top, we turned to our tried-and-true material: wood. We chose pallet wood - hard wood from pallets. We covered the floor and counter top with beautiful, warm wood. We made our own wood putty by combining sawdust - from the same wood - and wood glue. For the finish, we used tung oil - another one of our favorites because it's a natural product and easy to use.


When it came time to sand the wood, we fired up two sanders and went at it in a marathon session! We were covered in sawdust!! 

These last two photos show Bill and I taking a breather - literally: we had to exit the bathroom to get our breath back! 


Friday, May 4, 2012

Daisy Border

My sewing room has been through m any changes in the past seven years. After we painted the walls two-toned green - with two colors of paint in the same roller pan - I wanted a trim  between the lateral green striped effect on the top part of the wall and the scumbled green on the bottom of the wall. I was not happy with my first attempt to create a border - see photo; that's orange paint applied with a sponge cut in a rough square. At least I had some sort of border, though, right? I eventually decided I wanted a more structured design for a border/trim. So I scanned a real flower from our garden, dropped the scan into a Word Doc, then added a black border around the flower. I printed up a batch of these so I could glue them on the wall....

Trouble was, I had to cover up those ugly orange squares first. For this, I turned to my trusty old friend, brown wrapping paper. I cut the brown paper into strips, then glued it on the wall where I wanted the border to be. Then I glued the flowery squares over the brown paper.


PS: I love working with wallpaper paste; it's fun and easy to use.