Showing posts with label wall covering. Show all posts

Monday, May 7, 2012

Sleep Tight: The Bedrooms

While our style is a bit subdued in the rest of the house, we cut loose color-wise in the bedrooms. My husband picked the color for our bedroom walls . . . .

. . . .  and Will picked the color for his bedroom. And people think that I use color liberally! Ha! 
A funny story: When Bill suggested, one hot summer morning, that we should paint Will's bedroom, I went along with the idea; I was eager to check that task off our to-do list. The problem was, it was very hot that day. So While Bill went in to start painting, I had a brilliant idea: I would paint naked! It was that hot! So I took off all my clothes and sauntered into Will's room, where Bill was busily rolling paint onto the walls. And, guess what? Bill was naked! He had the same idea I had. Well, you know, people do say that Bill and I work well together!! They don't know the  half of it.....


Friday, May 4, 2012

Daisy Border

My sewing room has been through m any changes in the past seven years. After we painted the walls two-toned green - with two colors of paint in the same roller pan - I wanted a trim  between the lateral green striped effect on the top part of the wall and the scumbled green on the bottom of the wall. I was not happy with my first attempt to create a border - see photo; that's orange paint applied with a sponge cut in a rough square. At least I had some sort of border, though, right? I eventually decided I wanted a more structured design for a border/trim. So I scanned a real flower from our garden, dropped the scan into a Word Doc, then added a black border around the flower. I printed up a batch of these so I could glue them on the wall....

Trouble was, I had to cover up those ugly orange squares first. For this, I turned to my trusty old friend, brown wrapping paper. I cut the brown paper into strips, then glued it on the wall where I wanted the border to be. Then I glued the flowery squares over the brown paper.


PS: I love working with wallpaper paste; it's fun and easy to use.


Wednesday, April 18, 2012

Smiley Face

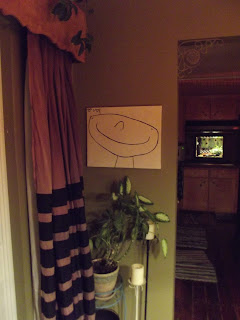
When our son Bob was a wee tot he loved to draw stick figures. I'm not apt to save children's artwork, but I just had to save one of his stick men for posterity.

One day I decided to copy Bob's smiley face stick man onto canvas. This was not  hard to do: I traced the original onto a piece of paper - because I didn't want to any harm to come to the original - then traced the copy onto the canvas. 

The result was simple but stunning. I made one of these for Bob and gave it to him so he could hang it in his home, then, some time later I made one for our home, too. 


Here's a shot of Bob when he was a 'wee tot.' That smile! What a smile!!

And here is a more recent pic of Bob.

Monday, April 16, 2012

Paper Bag Wall

Shortly after we moved into this house - at the tail end of 2004 - my husband painted all the walls off-white. In the process, he painted over wallpaper that was on an L-shaped section of the kitchen wall. You guessed it: The wallpaper bubbled. Bubbles everywhere! HUGE bubbles!! (Not really; they just looked huge to me.) I was in a panic. I'd read somewhere that one can paint over wall paper, but only with oil-based paint. I guess we found out the hard way not to paint over wall paper with latex paint. What was I going to do with that wall? I suggested to my husband that we start looking for a barn that someone might give us, so we could cover that wall with barn wood. 
In the meantime - till we could get our hands on some barn wood - I covered the wall with brown wrapping paper. I got a couple rolls of paper at the local office supply store, tore the paper into chunks, and applied it to the wall with wall paper paste. After each chunk was in place, I scrunched it around a bit so that it had a texture. After the paper was on the wall, my family loved the look. But I told them, 'I'm not done yet!' 
Next, I put two colors of paint in one roller pan and rolled those two colors onto the wall in one operation. The result was wonderful, and my family loved the look . . . .
But I wasn't done yet: Next, I covered the wall with oil-based stain. The stain snugged itself into the cracks and crevices of the paper. 
After I tired of the orange paint, I painted that 'paper bag wall' with two colors of green paint - same technique: two colors of green paint in one roller pan. I liked the green, and so did my family. I experimented a bit when I applied the green paints; I ran the roller across the wall in such a way as to create a plaid effect. 
We eventually added a pass-through in that wall, and we eventually put barn wood over my paper bag wall, but in the meantime, I really had fun with this part of our kitchen wall. 
I'm so glad for those initial bubbles - glad for our error in decorating judgment - for, in the end, I had a lot of fun with that wall. In future entries, I plan to share photos of the pass-through and such.