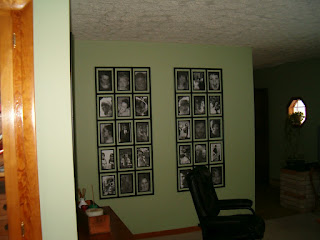
I really liked the display of pictures we put on the wall some years ago....
But when we put a pass-through in that wall, the display had to be taken down.
So I magnetized the adjacent wall and tacked two trellises to the wall to create a new photo display:
We enjoyed this display for some years, but I recently decided to try to recreate the original display - the one that was replaced by a pass-through, the display that showed close-ups of people we love. I wanted a display of photos that could be changed out easily. Eventually I hit upon the idea to slip photos between boards. So we we headed to Lowe's to get some 1x2s. My husband used a router to cut channels in the 8' long boards. We also brought home some hard board - the type wood used to make peg boards; the plan was to cut the hard board into 8"x10" pieces to slip between the channels in the 1x2s.
After the wood was cut, we removed the old trellis display.
Then we attached the 1x2s to the wall.
Bill's part was now done; it was time for me to glue pictures to the 8x10 boards and to paint the 1x2s.....
I'll include a photo of the channels made by the router. This photo, below, also shows some of the photos in place. The boards are spaced and sized so that the 8x10 boards can be slipped into the channels from the end of the display or from the front; the top channels are deep enough to allow this.
Phew! This was a huge undertaking! I glued over 180 photos to those 8x10 boards. I put pics on both the fronts and the backs so that I can switch the photos willy nilly from front to back. My rotary cutter, used in conjunction with a lazy Susan, helped make the trimming easy. But it was still a long process.
One by one, I filled the wall with photos. I'll end this blog entry with a flurry of photos. Please note that I also added a light fixture to the display. Watch for it...
Thanks for reading this. I'll add those photos now.
H
Happy Creating!!!!
Susan
 |
The newest version of this display of pictures: Black and White shots |


Photowall! "Album Spreadwall"!
ReplyDeleteI love that name, Dinu! And your naming this display made me start to come up with names of my own. What fun!!
ReplyDeleteWow! I loved all three designs that you had. How was the second design created?
ReplyDeletehttp://redoredux-faywray.blogspot.com/2012/04/trellis-project.html
ReplyDeleteKristi: Look at the last post for April of 2012 - it's labelled 'Trellis Project.' Let me know what you think......
“ woodworking pro weebly ” (Google it)
ReplyDeleteThis woodworking book contains a great deal of details about wood working. The book also shows several designs and explanations on the materials useful for different woodworking processes and the directions on completing different processes properly. In other words, I`m happy using this book, specially in the procedure of understading about wood working.?
Arbor Projects ,
Adirondack Chairs ,
Artwork Display ,
Bathroom Unit ,
Box Designs ,
Billiard/Pool Table ,
Barn Plans ,
Bed Plans ,
Bedside Cabinets ,
Bee Hive Plans ,
Bench Projects ,
Bird Feeders ,
Birdhouse Plans ,
Boat Plans ,
Book Case Plans ,
Baby Changing Table ,
Coat Rack ,
Cabin Plans ,
Cabinet Plans ,
Carport Plans ,
Cart Plans ,
Cat House Plans ,
CD/DVD Holder ,
Cellar Projects ,
Chair Plans ,
Chest Designs ,
Chicken Houses
Childrens Room Plans ,
Clock Plans ,
Coasters ,
Coffee Table Designs ,
Cold Frame Plans ,
Compost Bin ,
Computer Desk ,
Containers ,
Cradle Projects ,
Small Crafts ,
Cutting Board ,
Deck Plans ..